How to quickly create a REST API with a cluster of asynchronous task queues

Asynchronous tasks are the most common requirement in web backend development, and are ideal for multitasking and highly concurrent scenarios. This article shares how to use docker-compose, FastAPI, and rq to quickly create a REST API that contains a cluster of asynchronous task queues, and the nodes that execute the tasks on the backend can scale at will.
Architecture diagram of the system.
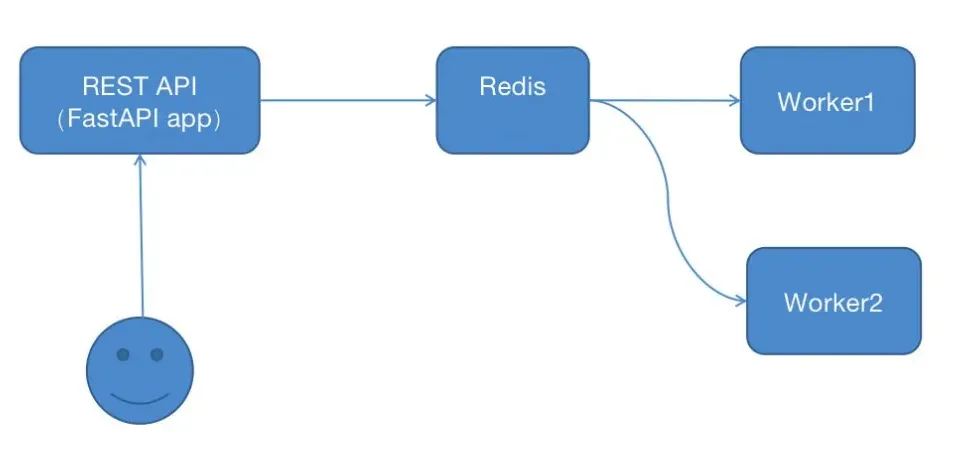
Each box in the above diagram can be interpreted as a server.
The user requests the api, the api puts the tasks into the redis queue, the worker automatically goes to the redis queue to retrieve the tasks and execute them, and the worker nodes can be scaled horizontally at will.
Next, let's implement a demo of this architecture, and you can see the power and convenience of docker.
1 Installing dependencies
dependencies on fastapi, redis, and rq libraries, and generate a requirements.txt file after installation
mkdir myproject
python3 -m venv env
source env/bin/activate
pip install rq
pip install fastapi
pip install redis
pip freeze > requirements.txt
2 Coding the REST API Worker
REST is a style that is not the focus here. We use FastAPI to quickly create an interface by creating a new api.py file with the following content.
from fastapi import FastAPI
from redis import Redis
from rq import Queue
from worker import send_captcha
app = FastAPI()

# Note that host is the host name, which is the service name in docker, and the service name in docker-compose.ymal will be the same
redis_conn = Redis(host='myproj_redis', port=6379, db=0)

# Define a queue with the name my_queue
q = Queue('my_queue', connection=redis_conn)

@app.get('/hello')
def hello():
    """Test endpoint""""
    return {'hello': 'world'}

# Rest API example
@app.post('/send_captcha/{phone_number}', status_code=201)
def addTask(phone_number: str):
    """
    Adds tasks to worker queue.
    Expects body as dictionary matching the Group class.

    """
    job = q.enqueue(send_captcha, phone_number)

    return {'job': "tasks add done."}
The send_captcha function here is an asynchronous task, imported from worker.py, which looks like this
import time

def send_captcha(phone_number):
    """
    Simulate a time-consuming asynchronous task
    """
    print(f'{time.strftime("%T")} ready to send phone captcha') # in place of actual logging
    print(f'{time.strftime("%T")} generating random captcha and storing it in redis, setting 5 minutes to expire')
    time.sleep(5) # simulate long running task
    print(f'{time.strftime("%T")} {phone_number} sending complete')
    return { phone_number: 'task complete'}
3 Building the Dokcer image
The goal now is to implement a cluster with two execution nodes. We need to start 4 containers to complete a cluster deployment.
- Container 1: running the FastAPI app
- Container 2: running the Redis service
- Container 3: running worker 1 service
- Container 4: running worker 2 service
Containers 1, 3, and 4 are all Python applications and can share a single Python image.
To facilitate debugging, we can make containers 1, 3, and 4 share our local path so that we don't need to rebuild the image if we change the code, which is more convenient.
Creating a Python image with dependencies
Now let's create a Python image that contains the previous requirements.txt dependency, and write a Dockerfile with the following content.
FROM python:3.8-alpine
RUN adduser -D myproj
WORKDIR /home/myproj
COPY requirements.txt requirements.txt
RUN pip install -r requirements.txt
RUN chown -R myproj:myproj . /
USER myproj
CMD uvicorn api:app --host 0.0.0.0 --port 5057
Content Description.
FROM python:3.8-alpine
Specify python:3.8-alpine, a container with Python 3.8 pre-installed, and run docker search python from the command line to see what Python images are available.
RUN adduser -D myproj
Add a user myproj, the main purpose of this step is to generate the directory /home/myproj
WORKDIR /home/myproj
Set the execution path of the program to /home/myproj
COPY requirements.txt requirements.txt
Copy requirements.txt from the current path to /home/myproj in the container. The .py file is not copied here because we will share the local path when we start the container later, so we don't need to copy it anymore.
RUN pip install -r requirements.txt
Install the dependencies in the container
RUN chown -R myproj:myproj . /
Change the owner and group of the files under the /home/myproj path to myproj, this step is to use the myproj user to start the fastapi service, production environments usually start with the root user, so this command is not needed.
USER myproj
Switch to the myproj user
CMD uvicorn api:app --host 0.0.0.0 --port 5057
The command to execute after the container is started, with service port 5057
Please refer to the official documentation for more Dockerfile syntax, this is only a brief description.
Now run the following command to build an image in the directory where the Dockerfile is located.
docker build -t myproject:latest .
Once created, you can use docker images to view it.
❯ docker images | grep myproj
myproject latest 6d4c3a7f5e34 13 hours ago 58.5MB
4 Starting the cluster
Here we use Docker Compose to start 4 containers, why use Docker Compose? Because it is convenient, if you don't use it, you need to start one container by one container manually.
Docker Compose reads a configuration file in yaml format and starts containers based on the configuration file, and each container shares the same network. Remember the Redis hostname used in api.py, here you need to set the redis service name to that hostname.
Write a docker-compose.yml that reads
version: '3'

services:
  myproj_redis:
    image: redis:4.0-alpine
    ports:
      - "6379:6379"
    volumes:
      - . /redis:/data

  myproj_api:
    image: myproject:latest
    command: uvicorn api:app --host 0.0.0.0 --port 5057
    ports:
      - "5057:5057"
    volumes:
      - . /:/home/myproj

  myproj_worker1:
    image: myproject:latest
    command: rq worker --url redis://myproj_redis:6379 my_queue
    volumes:
      - . /:/home/myproj

  myproj_worker2:
    image: myproject:latest
    command: rq worker --url redis://myproj_redis:6379 my_queue
    volumes:
      - . /:/home/myproj
The first container is myproj_redis, running the redis service. redis data is stored locally via volumes, so you need to create a local redis directory to map the /data directory inside the container.
The second container is the fastapi service on port 5057, using the local path mapped to /home/myproj
The third and fourth container is the worker node, which also maps to a local path, but only uses the worker.py file. When there are too many tasks, the worker node can be extended to solve the load pressure.
The final directory looks like this.

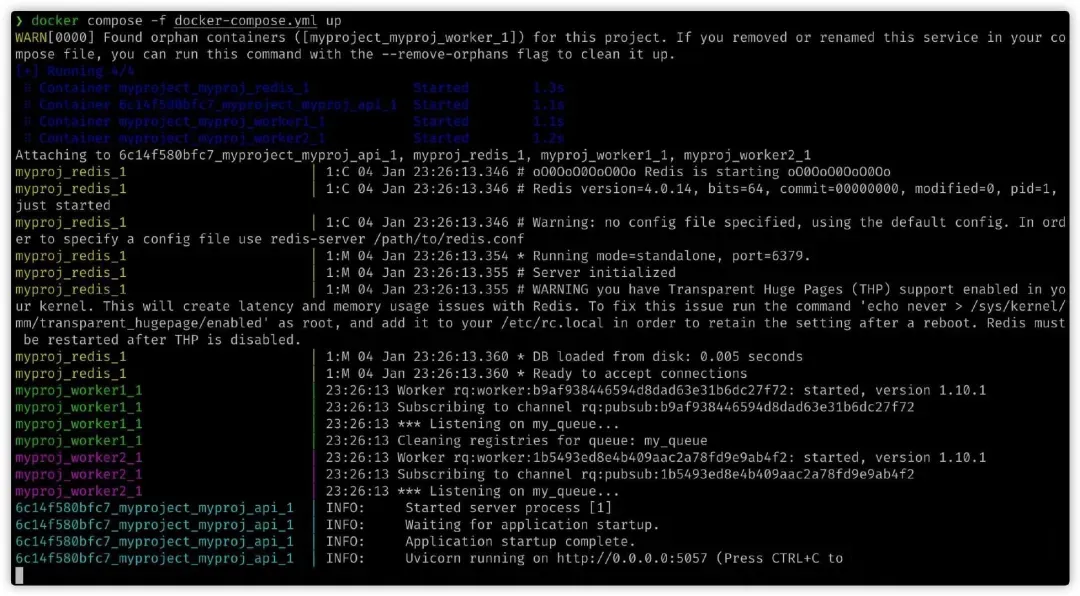
Execute the docker compose command to start 4 containers:
docker compose -f docker-compose.yml up
You can see that all 4 services are up and printing the log output normally.
5 Testing
Now let's test the window on the left, where I quickly sent 3 post requests using Python:
import subprocess
for i in range(3):
    subprocess.run("curl -v -X POST 'http://localhost:5057/send_captcha/18012345678'",shell = True)
The log output shows that both worker1 and worker2 have executed tasks, with worker1 executing 2 and worker2 executing 1.
